
Building a Containerized Application with ECS and Fargate

Running containers in production can feel overwhelming when you first approach AWS. You hear terms like ECS, EKS, Fargate, EC2 launch types, task definitions, and services. It gets confusing fast.
This article walks you through the complete flow of deploying a containerized application using Amazon ECS with Fargate. No servers to manage. No cluster capacity to worry about. Just your application running in containers.
By the end, you will understand each component and how they connect together.
What Are ECS and Fargate?
Amazon ECS
Elastic Container Service (ECS) is a container orchestration platform from AWS. It handles the scheduling, deployment, and management of your containers. Think of it as the brain that decides where and how your containers run.
AWS Fargate
Fargate is a serverless compute engine for containers. Instead of provisioning EC2 instances and managing their capacity, you simply tell AWS how much CPU and memory your container needs. Fargate handles the underlying infrastructure.
When you combine ECS with Fargate, you get container orchestration without server management.
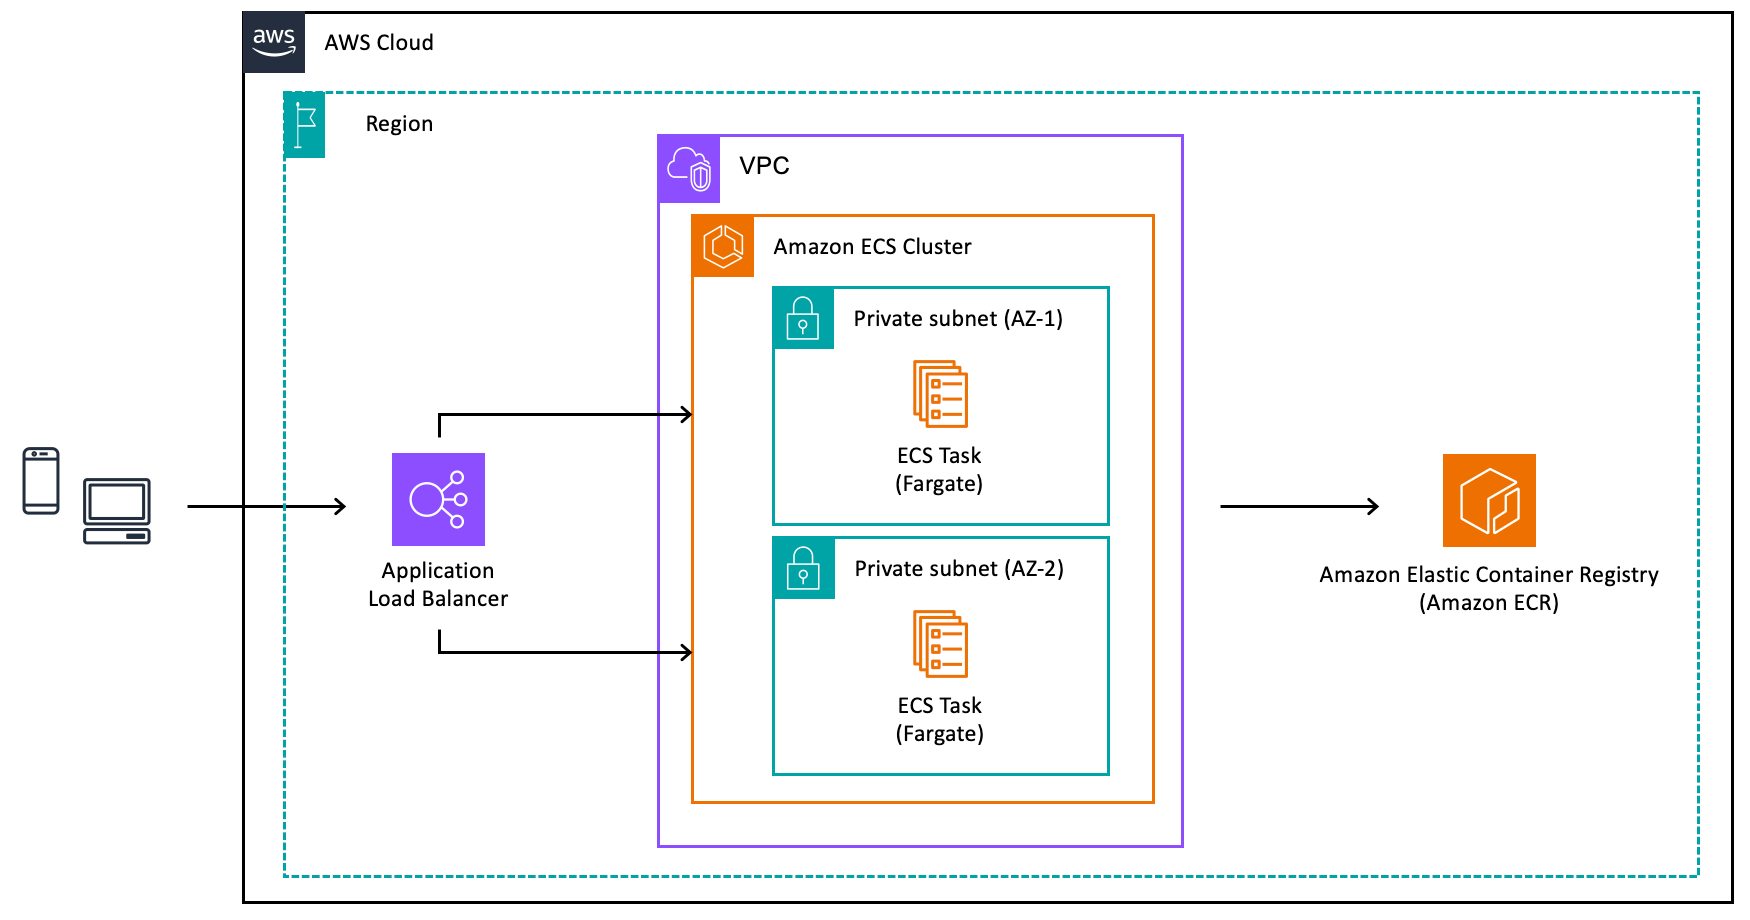
Architecture Overview
Before diving into the steps, let us look at the components involved.
The Complete Flow
Step 1: Prepare Your Application for Containerization
Start with your application. Whether it is a web API, a backend service, or a worker process, you need to package it into a container image.
Create a Dockerfile in your project root. This file contains instructions for building your container image. Define the base image, copy your application files, install dependencies, and specify the command to run your application.
Keep images small. Use multi-stage builds if needed. Smaller images mean faster deployments and lower costs.
Step 2: Create an ECR Repository
Amazon Elastic Container Registry stores your container images. Before pushing images, you need a repository.
Navigate to the ECR console and create a new private repository. Choose a meaningful name that reflects your application. Enable image scanning to automatically check for vulnerabilities when images are pushed.
Configure lifecycle policies to automatically clean up old images. This prevents storage costs from growing indefinitely.
Step 3: Build and Push Your Image
Build your container image locally using Docker. Tag the image with your ECR repository URI. The tag should include a version identifier such as a git commit hash or semantic version number.
Authenticate Docker with ECR using the AWS CLI. This generates temporary credentials that allow Docker to push images.
Push the tagged image to your ECR repository. Verify the push succeeded by checking the repository in the console.
Step 4: Set Up the Network Infrastructure
Your containers need a network to run in. Create a VPC or use an existing one.
Design your subnets carefully. Place your Fargate tasks in private subnets. They do not need direct internet access. Place the Application Load Balancer in public subnets so it can receive traffic from the internet.
Create a NAT Gateway in a public subnet. Your tasks in private subnets need this to pull images from ECR and access other AWS services.
Configure security groups. Create one for the load balancer that allows inbound traffic on your application port. Create another for the Fargate tasks that only allows traffic from the load balancer security group.
Step 5: Create IAM Roles
ECS requires two types of IAM roles.
The task execution role allows ECS to pull images from ECR, send logs to CloudWatch, and retrieve secrets from Secrets Manager or Parameter Store. AWS provides a managed policy called AmazonECSTaskExecutionRolePolicy that covers most use cases.
The task role is what your application uses at runtime. Attach policies based on what AWS services your application needs to access. If your app reads from S3, add S3 read permissions. If it writes to DynamoDB, add those permissions. Follow the principle of least privilege.
Step 6: Create an ECS Cluster
The cluster is a logical grouping for your services and tasks. Navigate to the ECS console and create a new cluster.
Give it a descriptive name. Enable Container Insights if you want detailed metrics and logs. This adds cost but provides valuable observability.
With Fargate, the cluster is essentially just a namespace. There are no EC2 instances to manage.
Step 7: Define Your Task Definition
The task definition is a blueprint for your container. It describes how your container should run.
Specify the following:
Family name: A unique identifier for your task definition. New revisions will share this name.
Launch type: Select Fargate.
CPU and memory: Choose appropriate values based on your application requirements. Fargate has specific combinations available.
Container definition: Provide the ECR image URI, container port mappings, environment variables, and log configuration.
Networking mode: Use awsvpc mode. This is required for Fargate and gives each task its own elastic network interface.
Log configuration: Send logs to CloudWatch Logs. Create a log group beforehand or let ECS create one automatically.
Step 8: Create an Application Load Balancer
The load balancer distributes traffic across your tasks and provides a stable endpoint.
Create an Application Load Balancer in your public subnets. Configure listeners for HTTP on port 80 or HTTPS on port 443. For production, always use HTTPS with an ACM certificate.
Create a target group with the target type set to IP. This is required for Fargate. Configure health checks to verify your application is responding correctly.
Set the health check path to an endpoint your application exposes. Configure appropriate thresholds and intervals based on how quickly your application starts.
Step 9: Create the ECS Service
The service maintains the desired number of tasks and integrates with the load balancer.
Navigate to your cluster and create a new service. Select the task definition you created earlier.
Configure the following:
Launch type: Fargate.
Desired count: The number of tasks you want running. Start with two for high availability.
Deployment configuration: Use rolling updates. Set minimum healthy percent to 100 and maximum percent to 200. This ensures zero downtime during deployments.
Network configuration: Select your VPC, private subnets, and the security group for tasks. Enable auto-assign public IP only if tasks are in public subnets.
Load balancing: Select the Application Load Balancer and target group you created.
Service discovery: Optionally enable Cloud Map integration for internal service-to-service communication.
Step 10: Configure Auto Scaling
Your application should scale based on demand. ECS Service Auto Scaling adjusts the desired count automatically.
Configure target tracking scaling policies. Common metrics include:
CPU utilization: Scale when average CPU across tasks exceeds a threshold.
Memory utilization: Scale when memory usage grows.
Request count per target: Scale based on how many requests each task handles.
Set minimum and maximum task counts. The minimum ensures you always have capacity. The maximum prevents runaway scaling and unexpected costs.
Step 11: Set Up Logging and Monitoring
Observability is critical for production workloads.
Your tasks should already send logs to CloudWatch Logs based on the task definition configuration. Create CloudWatch alarms for key metrics such as CPU utilization, memory utilization, and running task count.
Enable Container Insights on your cluster for enhanced metrics. This provides task-level and container-level visibility.
Set up CloudWatch dashboards to visualize your application health at a glance.
Step 12: Verify the Deployment
Once the service is running, verify everything works correctly.
Check the ECS console. Your service should show the desired number of running tasks. If tasks are failing, check the stopped tasks for error messages.
Check the target group health. All registered targets should be healthy. If not, verify security group rules and health check configuration.
Access your application through the load balancer DNS name. Verify it responds as expected.
Deployment Flow for Updates
Once your initial deployment is complete, updating your application follows this flow:
Make changes to your application code
Build a new container image with a new tag
Push the image to ECR
Create a new task definition revision pointing to the new image
Update the ECS service to use the new task definition
ECS performs a rolling deployment automatically
Old tasks drain connections and stop
New tasks start and register with the load balancer
This process can be automated with CI/CD pipelines using services like CodePipeline, GitHub Actions, or GitLab CI.
Best Practices
Keep Images Lean
Smaller images deploy faster. Use minimal base images. Remove unnecessary files and dependencies.
Use Specific Image Tags
Never use the latest tag in production. Always use specific versions so deployments are predictable and rollbacks are possible.
Implement Health Checks
Define health checks at both the container level and load balancer level. This ensures traffic only routes to healthy tasks.
Store Secrets Securely
Never bake secrets into container images. Use Secrets Manager or Parameter Store. Reference them in your task definition and inject them as environment variables at runtime.
Plan for Failure
Run tasks across multiple availability zones. Set appropriate desired counts. Configure auto scaling to handle load spikes.
Monitor Costs
Fargate pricing is based on CPU and memory. Right-size your task definitions. Use Spot capacity for fault-tolerant workloads to reduce costs significantly.
Common Pitfalls to Avoid
Incorrect security group rules: Tasks cannot pull images or register with load balancers if security groups block traffic.
Missing NAT Gateway: Tasks in private subnets cannot reach ECR or other AWS services without a NAT Gateway or VPC endpoints.
Health check misconfiguration: If the health check path returns errors or times out, tasks will be marked unhealthy and constantly replaced.
Insufficient task role permissions: Your application will fail to access AWS services if the task role lacks required permissions.
Forgetting to update the service: Creating a new task definition revision does not automatically deploy it. You must update the service.
Conclusion
Deploying containers on ECS with Fargate removes the burden of managing servers while giving you full control over your application. The initial setup involves several components, but each serves a clear purpose.
Start with a simple deployment. Get it working end to end. Then iterate by adding auto scaling, improving monitoring, and building CI/CD pipelines.
The serverless nature of Fargate lets you focus on your application rather than infrastructure. You pay only for the resources your containers use, and scaling happens automatically based on your policies.
Now you have a clear roadmap. Pick your application and start building.