
Build a Personal Blog with WordPress on AWS: A Comprehensive Guide

As a Cloud engineer, setting up a scalable, reliable WordPress blog on AWS is a perfect way to showcase your skills while creating a platform for your thoughts. In this article, I'll guide you through creating a scalable, resilient WordPress blog using core AWS services.
Why Host WordPress on AWS?
Before we dive into the architecture, let's consider the advantages of this approach:
Complete Control: Unlike managed WordPress services, you have full access to the underlying infrastructure, allowing for custom configurations and optimizations.
Scalability Demonstration: A properly architected WordPress site can handle traffic from a few visitors to thousands, showcasing your ability to design scalable systems.
Security Implementation: You'll implement security at multiple layers, demonstrating your understanding of defense in depth.
Cost Optimization Skills: The architecture allows you to balance performance needs with cost considerations, an essential skill for any cloud professional.
Technical Conversation Starter: During interviews, your blog architecture becomes a concrete example of your AWS expertise.
The Architecture: Scalable WordPress on AWS
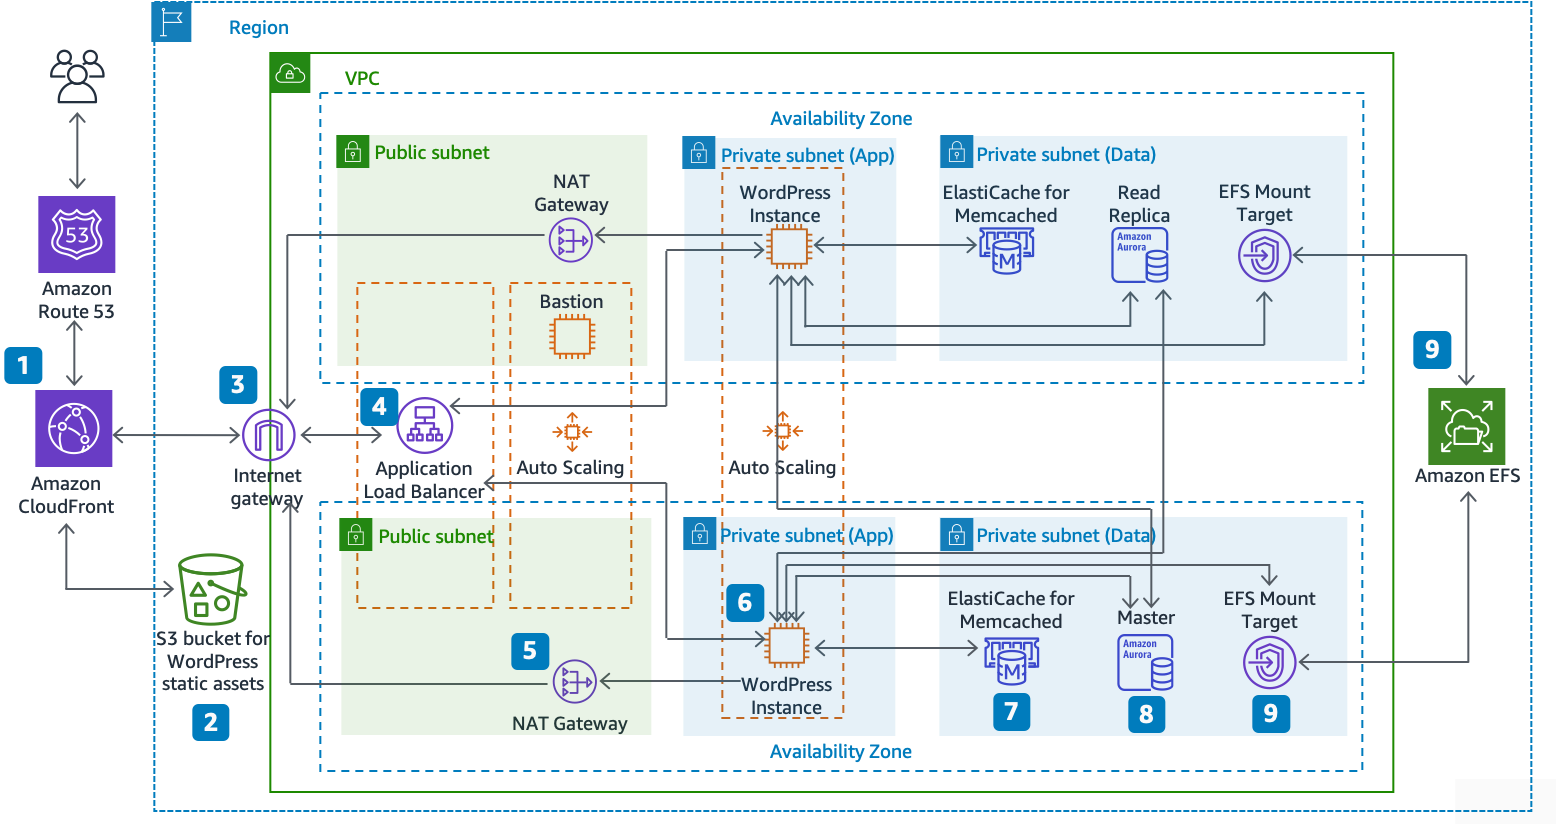
Find the reference architecture link here.
Let's explore the key components of our WordPress architecture:
Networking Foundation: Amazon VPC
Amazon Virtual Private Cloud (VPC) provides the networking foundation for our WordPress blog. It creates an isolated network environment where we can precisely control security and connectivity.
The multi-tier design includes:
Public subnets across multiple Availability Zones for our load balancers
Private subnets for our WordPress application servers
Isolated subnets for our database
This network segregation ensures that our database is never directly accessible from the internet, and our application servers can only be reached through the load balancer, significantly improving our security posture.
Database Layer: Amazon RDS
Amazon Relational Database Service (RDS) provides a managed MySQL database that powers WordPress. RDS handles routine database tasks like backups, patching, and replication, allowing you to focus on your content rather than database administration.
Key benefits include:
Multi-AZ deployment for high availability
Automated backups with point-in-time recovery
Performance insights for database monitoring
Storage autoscaling to handle growing content
By separating the database from the application servers, we gain the ability to scale each component independently and improve the overall reliability of the system.
Shared Storage: Amazon EFS
WordPress stores uploads, themes, and plugins in its file system. With multiple application servers, we need a shared storage solution, which is where Amazon Elastic File System (EFS) comes in.
EFS provides:
Shared access from all WordPress instances
Automatic scaling without pre-provisioning
High durability with data replicated across multiple AZs
Performance modes optimized for different workloads
When a user uploads an image to your blog, it's immediately available to all servers in your fleet, ensuring a consistent experience regardless of which server handles subsequent requests.
Application Layer: EC2 with Auto Scaling
Amazon EC2 instances run the WordPress application. Rather than managing individual servers, we'll use an Auto Scaling Group to maintain the desired number of healthy instances automatically.
The application layer includes:
Launch Templates defining the WordPress server configuration
Auto Scaling Groups that adjust capacity based on demand
Instance health checks to replace unhealthy servers
This approach ensures your blog remains responsive during traffic spikes while automatically scaling down during quiet periods to optimize costs.
Load Distribution: Application Load Balancer
The Application Load Balancer (ALB) sits in front of your WordPress servers, distributing traffic and providing a single entry point to your blog.
The ALB offers:
Intelligent traffic routing to healthy instances
SSL/TLS termination for secure connections
Session stickiness for consistent user experiences
Health checks to detect and route around failures
By routing traffic only to healthy instances across multiple Availability Zones, the ALB significantly improves the availability and fault tolerance of your blog.
Implementation Approach
1. Design Your Network Architecture
Start by creating a VPC with appropriate CIDR blocks. Design your subnet structure with future growth in mind, and implement network access controls through route tables and network ACLs.
Security groups act as virtual firewalls, controlling traffic at the instance level. Create specific security groups for each component:
Load balancer security group (allows HTTP/HTTPS from the internet)
Web server security group (allows traffic only from the load balancer)
Database security group (allows MySQL traffic only from web servers)
EFS security group (allows NFS traffic only from web servers)
2. Set Up the Database Layer
Create a MySQL RDS instance in your database subnets. Choose Multi-AZ deployment for high availability and configure appropriate instance sizing based on your expected traffic.
Consider these settings:
Enable storage autoscaling with reasonable upper limits
Set an appropriate backup retention period (7 days is common)
Configure parameter groups optimized for WordPress
Enable enhanced monitoring for performance insights
Store your database credentials in AWS Secrets Manager rather than hardcoding them in configuration files.
3. Implement Shared Storage
Create an EFS file system with mount targets in each private subnet. Configure the appropriate performance mode based on your needs (General Purpose is sufficient for most blogs).
Consider enabling lifecycle management to move infrequently accessed files to cost-effective storage classes, reducing your storage costs without affecting availability.
4. Configure the Application Layer
Create a Launch Template that defines your WordPress server configuration. This should include:
Amazon Linux 2 or Ubuntu AMI
Instance type selection (t3.micro or t3.small is sufficient to start)
User data script that installs and configures WordPress
IAM role with permissions to access other AWS services
EBS volume configuration for the operating system
Your user data script should handle mounting the EFS file system to the appropriate WordPress directory and configuring WordPress to connect to your RDS database.
5. Set Up Load Balancing and Auto Scaling
Create an Application Load Balancer in your public subnets. Configure listeners for HTTP and HTTPS, with appropriate security groups.
Create a target group for your WordPress instances with health checks that verify WordPress is functioning correctly, not just that the server is responding.
Configure your Auto Scaling Group to:
Use your Launch Template
Span multiple Availability Zones for high availability
Maintain a minimum of two instances for redundancy
Scale based on appropriate metrics (CPU utilization or request count)
Perform health checks against both EC2 and the load balancer
6. Set Up DNS and SSL
Register a domain through Route 53 or connect an existing domain. Request an SSL certificate through AWS Certificate Manager and configure your load balancer to use it.
Create appropriate DNS records pointing to your load balancer, ensuring both your apex domain (example.com) and www subdomain (www.example.com ) are properly configured.
7. Implement Monitoring and Logging
Set up CloudWatch alarms for key metrics across your infrastructure:
EC2 instance CPU and memory utilization
RDS database connections and CPU
Load balancer latency and error rates
EFS burst credits and throughput
Configure centralized logging using CloudWatch Logs to collect and analyze logs from your EC2 instances, RDS database, and load balancer.
Cost Optimization Strategies
A well-architected WordPress blog on AWS can be surprisingly cost-effective:
Right-size your instances: Start with smaller instance types and scale up only when needed based on actual usage patterns.
Implement auto-scaling: Scale your fleet down during low-traffic periods (like overnight) to reduce compute costs.
Consider Reserved Instances: If you have a baseline level of traffic, Reserved Instances can provide significant savings over On-Demand pricing.
Use EFS lifecycle management: Automatically transition infrequently accessed files to lower-cost storage classes.
Monitor and optimize RDS: Choose the appropriate instance size and storage type based on your workload characteristics.
Security Best Practices
Security should be implemented at multiple layers:
Network security: Use security groups and network ACLs to control traffic flow.
Data encryption: Enable encryption for RDS, EFS, and EBS volumes to protect data at rest.
Secure connections: Use HTTPS exclusively for your blog with certificates from AWS Certificate Manager.
WordPress security: Keep WordPress core, themes, and plugins updated, and implement security plugins like Wordfence.
IAM best practices: Follow the principle of least privilege when creating roles for your EC2 instances.
Regular backups: Implement automated backups of your database and file system.
Enhancing Your WordPress Blog
Once your core architecture is in place, consider these enhancements:
Content Delivery: Implement CloudFront as a CDN to cache and deliver content from edge locations worldwide.
Caching Layer: Add ElastiCache (Redis or Memcached) for object caching to reduce database load.
Media Optimization: Use S3 with the WP Offload Media plugin for more scalable media handling.
DDoS Protection: Implement AWS Shield and WAF to protect against common web exploits and DDoS attacks.
Serverless Functions: Add Lambda functions for specific tasks like image resizing or notification delivery.
Conclusion
Building a WordPress blog on AWS demonstrates your ability to architect scalable, secure, and cost-effective solutions. This approach transforms your blog from just a content platform into a showcase of your cloud engineering skills.
When a potential employer asks about your experience with AWS services like VPC, EC2, RDS, or EFS, you can point to your blog and explain the architectural decisions you made, the security measures you implemented, and how you optimized for both performance and cost.
The beauty of this project is its flexibility. You can start with a simpler architecture and gradually enhance it as you learn new AWS services and techniques. Each enhancement becomes another demonstration of your growing cloud expertise.
Remember, the goal isn't just to have a blog—it's to create a living example of your AWS skills that grows with your career. Happy blogging!
Thanks...love the post....